
Now that you are suited up with a great camera for travel, something small and tote-able that won’t weigh you down like the RX100 or the Sony A6000 (or Sony A7iii), I want to equip you with the skills on how to take fantastic photos wherever you go! As I mentioned in this post, a lot of it is about the post-processing, but there are some tips to make sure you’re taking great photos every trip. Remember, as you are learning, not every photo is going to be great, I still take “trash shots” but it’s a part of the learning process with your equipment. This is how to take the best travel photos.
How to Take the Best Travel Photos
Have Easy to Use Equipment
As I mentioned in this post, the ideal camera for traveling is something small and easy to pack in a bag. You can read in detail why I like the cameras I recommended here but for a quick recap, either the RX100 (under $500) or the Sony A6000 (Under $500) or Sony A7iii ($2000) is perfect for travel photography. Make sure you have multiple SD cards, a good camera strap for your wrist or a neck camera strap.
Recommended Camera Gear for Travel

Think Before You Snap, Plan Your Photos
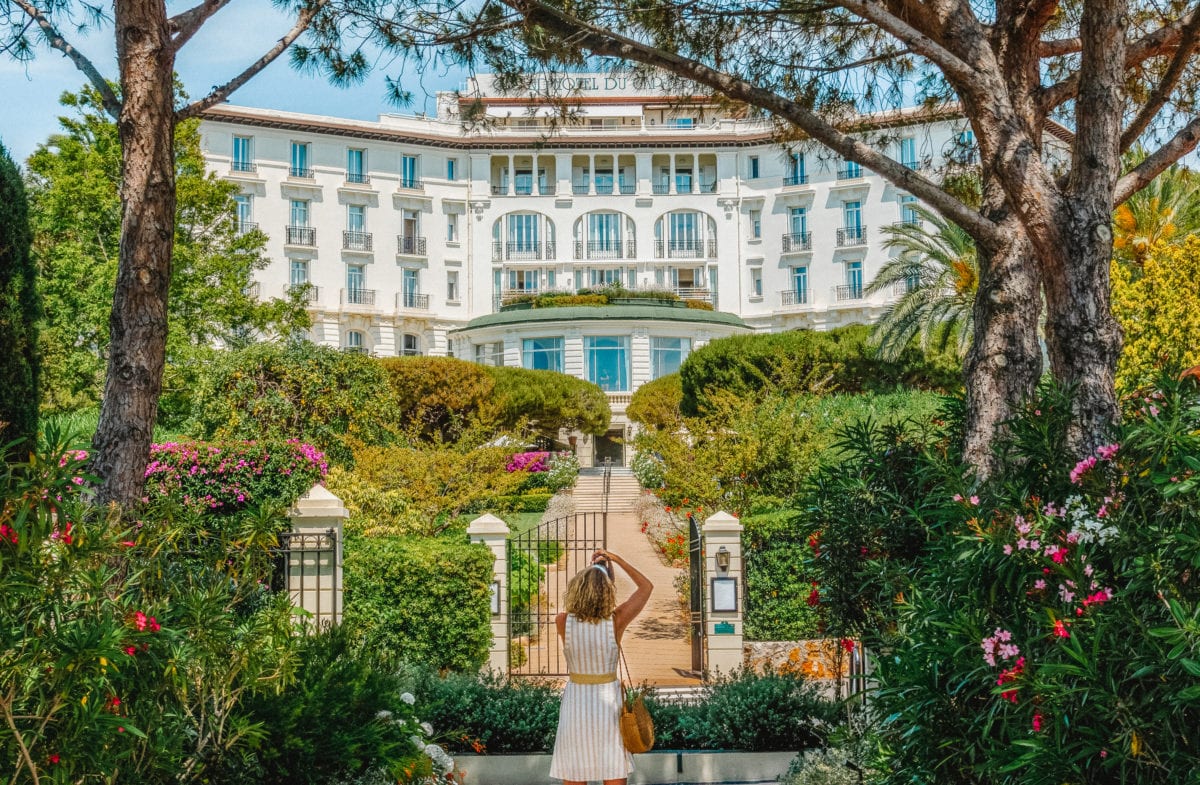
Too often, I see people feverishly snapping away at a landscape or whatever they see without care of what they’re taking a photo of. When you plan out your photos and take the time to study the object and assess the lighting, it will help you suss out the “trash shots” versus the keepers. Digital photography is much more forgiving in that you can take multiple photos in hopes of getting the shot, but that doesn’t mean you need to overshoot. When you overshoot, you have a tendency to never edit or appreciate your photos. Case and point, why you have 10,000+ photos on your iPhone.
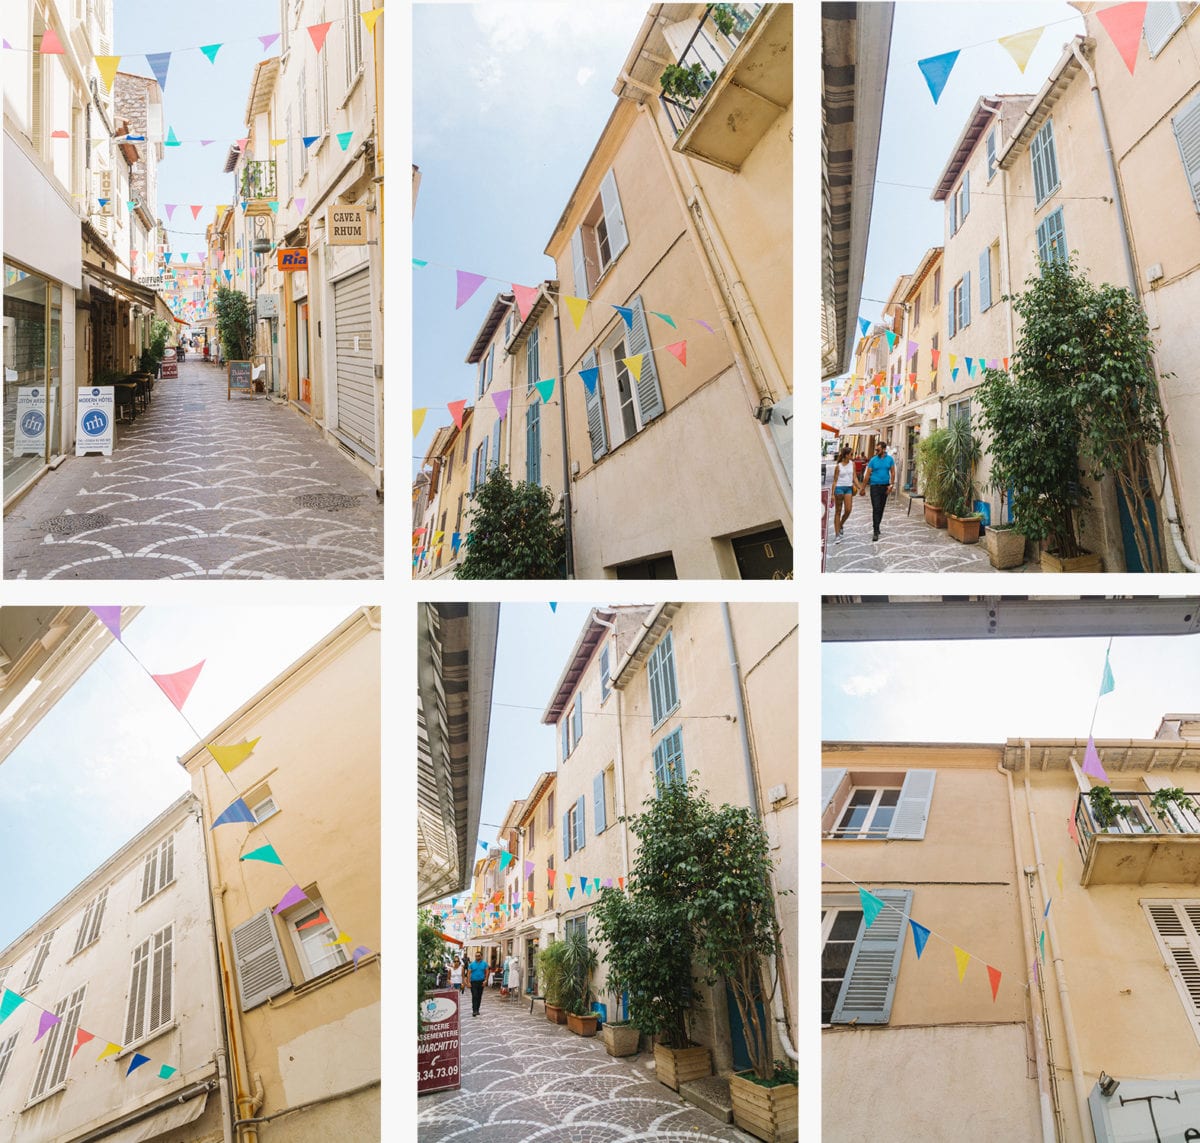
If you have found your object that you’re going to shoot, let’s say it’s an alleyway in France with flags, you may need to experiment with angle and aperture. After each shot, if you don’t feel like you got it the first time, change one thing leaving all others constant until you’ve got it. Maybe you need to get lower for a different angle, maybe you need to try from the side, straight on, or what have you.
If you see something worthy of a photo, take your time to take the shot, and be mindful that everything you see may not be worthy of a photo.
When Getting a Photo of You, Choose Wisely & Explain As Much As Possible
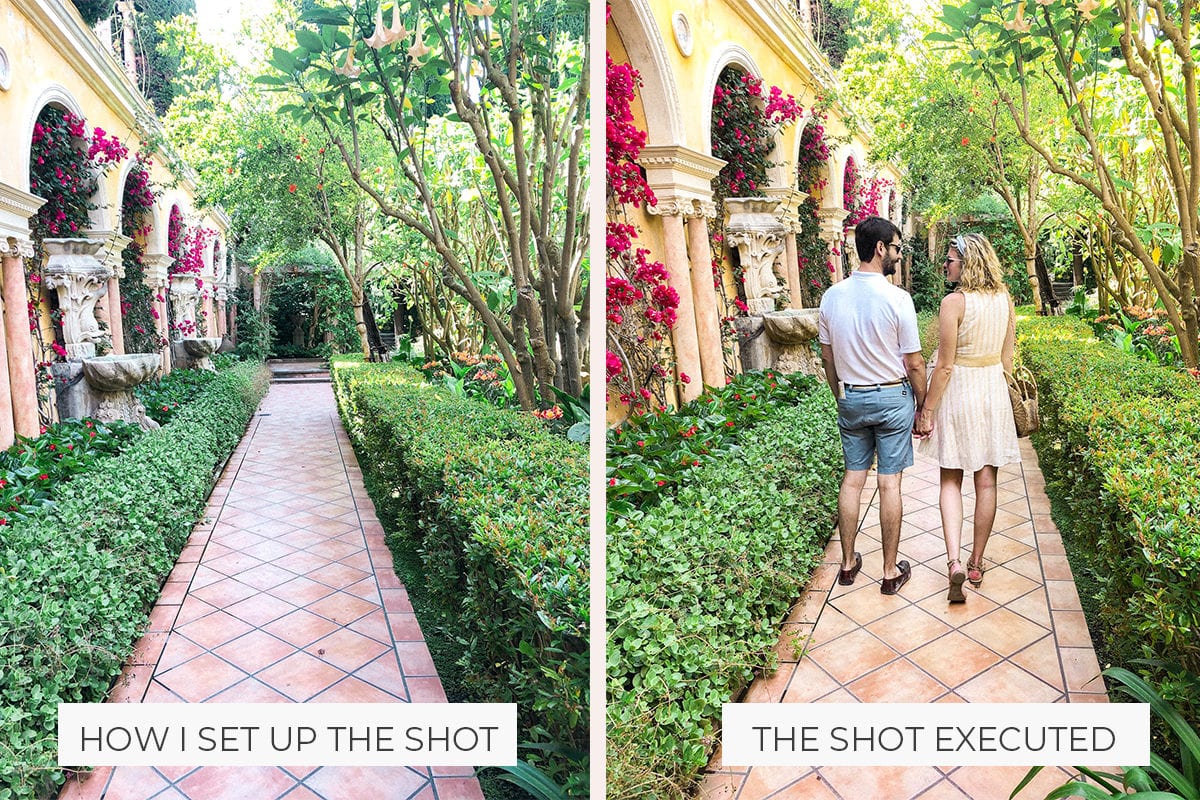
Whether you’re traveling alone or with friends and family, you should never compromise an opportunity to get a photo of you because you’re afraid it won’t turn out right. I’m fortunate that my fiance already knows how to compose a photo, but even when he helps me take a photo, I still explain very clearly what I want and sometimes, I’ll have him stand in place where I’ll be, set the shot up and then ask him to replicate it for me. That way, I’m exactly where I want to be in the shot and we don’t have to spend more time than necessary trying to get my vision. Chances are if you’re in a high tourist area, you have about 2 seconds before someone could walk through your photo. If the person you are asking to take the photo for you doesn’t have experience taking a photo, setting up the shot is my preferred method of asking someone to take a photo.
When it comes to choosing a stranger to take your photo, look for someone who may speak your language and also is carrying similar (or better) camera equipment. Chances are you won’t have to explain as much about composition and they won’t run off with your equipment. As a courtesy, always offer to take a photo of them in return. Who knows, maybe you’ll make a new international friend! That’s the point of travel, no?
Study Inspiring Photos at Home Prior to Your Trip
I have an entire Pinterest board dedicated to photography angles and different perspectives that inspire me when I scroll through social media. I also follow a variety of international travelers and photographers to see how they capture the shots. While I may not be at the level of their photography, they always share a new perspective for me to emulate next time I go out into the world. Studying these angles and even practicing while you’re out and about at home will help you become a much better photographer.
Know How Light Affects Your Photos
Chances are if you’re researching photography, you’ve heard the term “golden hour” thrown around. It’s essentially the time of the day when you get the softest, most forgiving light and typically occurs around dawn (6-8am) and dusk (7-9pm) in the summer months. If you aim to shoot at these times of the day, especially the morning hours, you will see fewer tourists and have more opportunities to take great photos with less post-processing. It’s my preferred time of day to take photos but most of the trips we go on, we end up walking all mid-morning and afternoon which is the harshest light to take photos in so a lot of post-processing is due on my part when we get home.
Golden Hour: Soft light with good color saturation
Mid-day: Harsh warm light with oversaturation
Cloudy Days: Gray/ blue light that needs saturation

Post-Processing Your Images is KEY to Having Photos You Want to Hang Up
I want to acknowledge something, every travel blogger and most travel photographers photos you see online is post-processing in some way. There is a lot of post-processing that goes on that the average consumer doesn’t see, nor even knows is possible. Now that I know how to airbrush unsightly things out of my photo in photoshop, I’m keen on removing trash, powerlines, tourists, and whatnot from photos I intend on hanging, however, some people go extreme and will photoshop extra elements in, or make a landscape seem more dreamy (more stars, more bistro lights, more fireworks, fake fireworks, fake sunset, you name it they do it) for the gram.
What I’m trying to say is, that although post-processing is a normal function for digital photography, understand that comparing your travel photos to those online is only going to hurt your self-esteem as you’re learning photography and make that travel destination less whimsical when you arrive. So proceed with caution when you are trying to replicate shots you see on Instagram, everything is not as it seems.
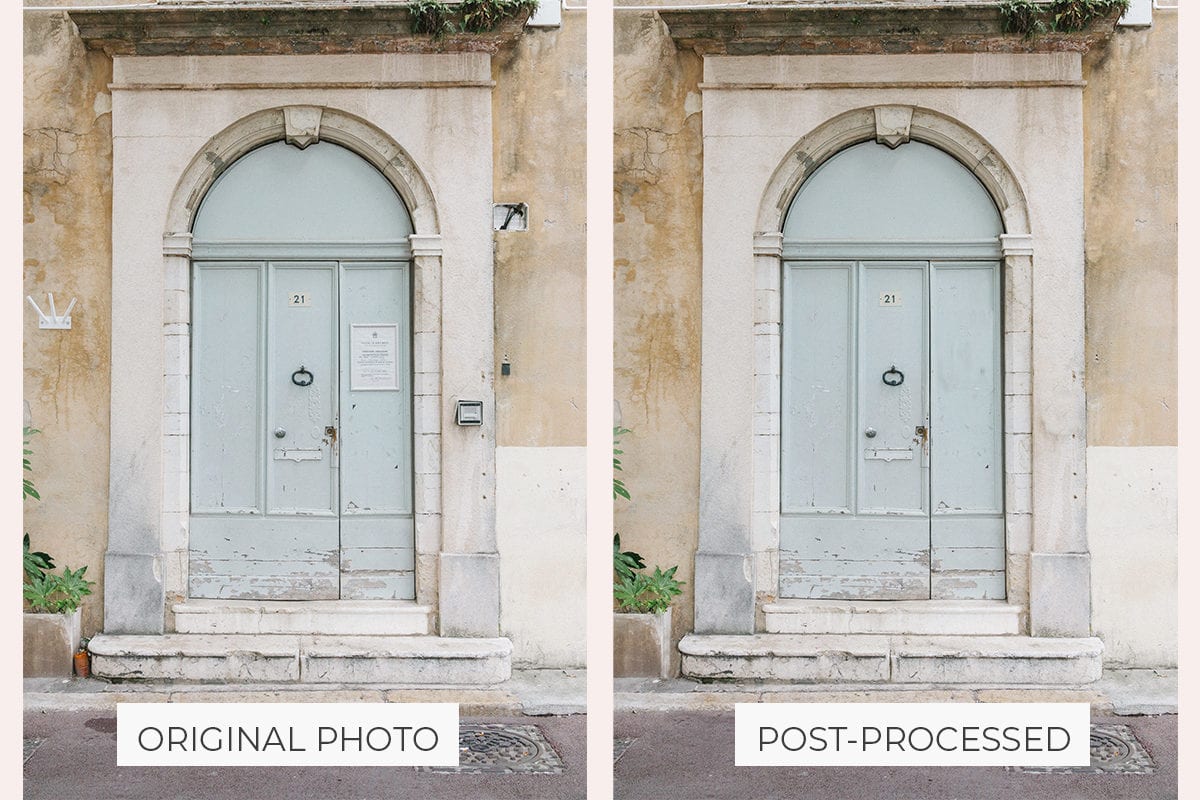
Example of the post processing I did to this beautiful blue door: removed the elements on the plaster walls, removed the white sign from the door, removed the stains in the sidewalk, and removed the orange bottle from between the planter and the step.
Ethically, I don’t have a problem with post-processing in minimal regard. When I took the above photo, I was so struck by the blue door I didn’t even realize all the other stuff lurking around it. It wasn’t until I edited it that I realized there was a lot of trash lingering. Since I wanted to frame this one, I decided to remove the unsightly distractions from the photo in photoshop with the clone stamp tool.
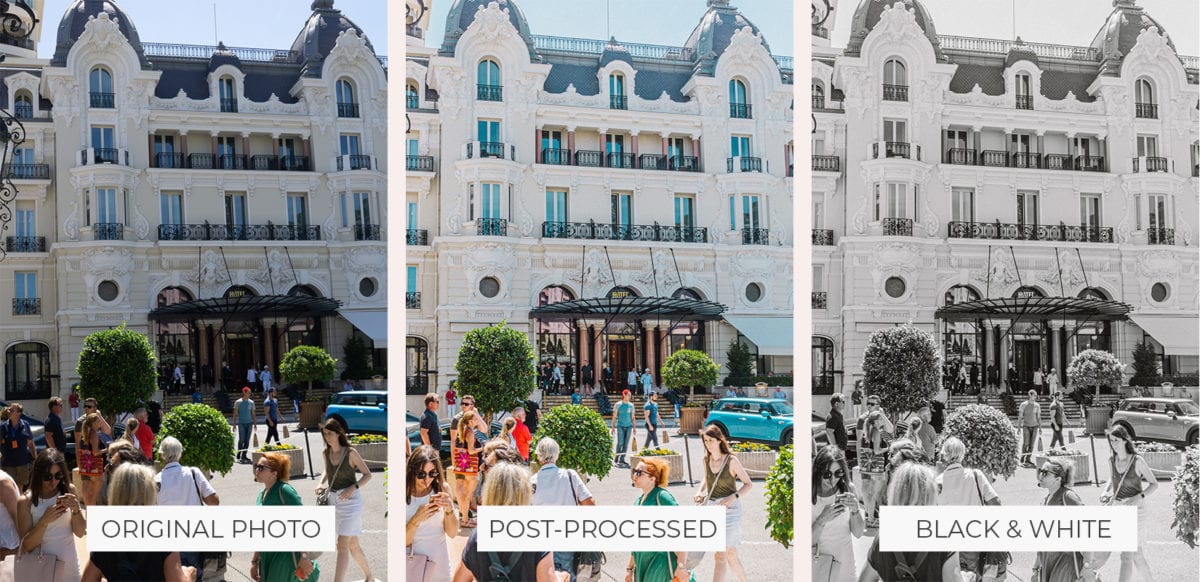
Before you Delete that Oversaturated or “Trash Shot” Try a Black & White Edit
The truth is, even if you spent hours in photoshop, editing color, correcting tones and etc, some photos just don’t turn out. Before I completely throw away a photo (especially if it’s the only one I got from a certain location) I experiment by turning it into a black and white photo. Nine times out of ten when I do this, I end up finding out that I like it better in black and white!
Black and white filters are great for when you have a very sunny day that saturates your photo with a lot of sun, altering the colors to the extreme. It’s great when there’s a lot of tourists in your photo wearing different shades of neon. It’s great for getting that vintage, romantic film feel to each photo. It’s also great when you’re incredibly lazy and don’t want to edit any more of your photos. Below is an example of one of the few photos we took in Monte Carlo that I hated in color but love in black and white.
Keep A Record of Your Photos
While photos are worth a thousand words, it’s really easy to forget what you did by the end of your trip if you don’t write it down. I always travel with a notebook and am constantly storing pins in my google maps or notes in my phone of where we went, what we ate, how it tasted, the smells, the sounds, and more. Whether you want to do that visually with the world, Instagram is a good place to do that but dangerous because you don’t own the platform, or a personal blog (you can keep it private) to save all your memories too.
Remember to print and frame the ones you love! You spent a lot of time taking those photos so be sure to show them off as you intended.
If you have any questions, feel free to leave them in the comments below! Looking forward to seeing how your photos end up! Be sure to check out our gear recommendations if you’re traveling!
Recommended Camera Gear for Travel


These are such great tips!!
Thank you!
xx, Elise
http://www.sparkleandslippers.blogspot.com
Enjoy! <3